
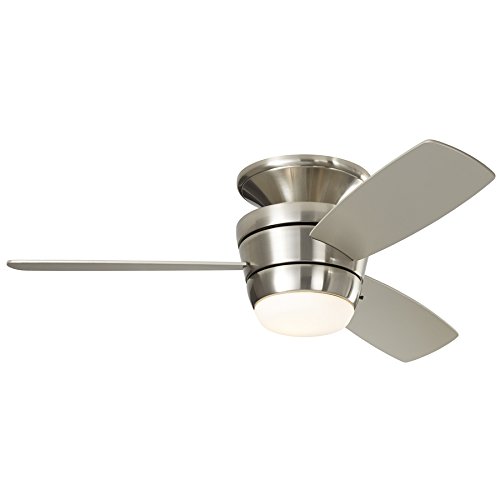
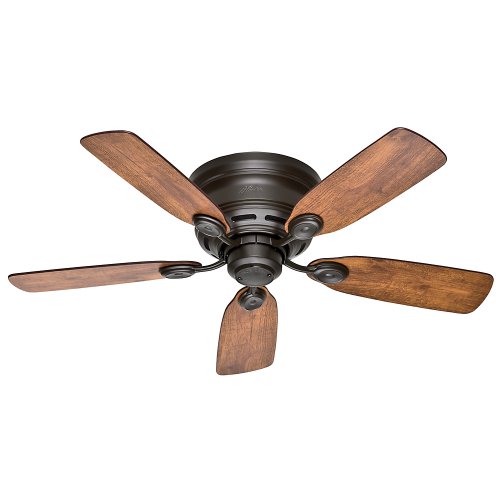
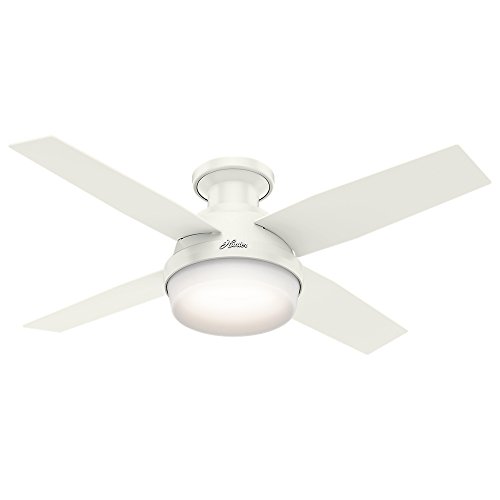
A flush mount ceiling fan is a fan that is fixed firmly to the ceiling to allow the base to fit flush against the ceiling. It is usually made for rooms with low ceilings and for those who prefer a low profile.
Table of Contents
Well, if your ceiling is 7.5 feet high or less than that, then a standard ceiling fan cannot meet the 7 feet minimum distance requirement of the fan blades to the floor. For safety, go for a flush mount ceiling fan.
Usually, a down rod is between the mount of the fan and the center of the fan blades. It is that thing that allows the fan to be closer to the ground and it is proper for a home with large rooms and high ceilings. However, a flush mount ceiling fan reduces a lot of stress in this regard because you do not need a down rod to fix your ceiling fan.
Living in a home with an 8-foot high ceiling or where the ceiling fan is fixed with a long rod may expose a tall person to the risk of being injured or constantly bumping into the fan when it is moving and even when it is not moving. Therefore, installing a ceiling fan that would allow for enough space between the ceiling and the floor will reduce the risks of being exposed to accidents.
The flush mount ceiling fan is that fan you want to go for if you want your visitors to look up and marvel at such a beautiful ceiling fan you have. Almost all flush mounts have modern looks and most are made with stainless steel. It definitely makes a pretty good addition to your room.
Talk of sophistication! Instead of having to climb chairs to change speed of moving blades or turn on and off the lights of the fan, a flush mount ceiling fan has a wall switch for easy control of the fan making it easily accessible. This is definitely a yes for your choice of ceiling fans.
Now, we understand that it might pose a bit of difficulty trying to install your flush mount ceiling fan. But not to worry, you do not need to hire an expert to do that for you, we have got you covered. So, pay attention and follow through the steps.
There are some essentials you would need to install your flush mount ceiling fan. Once you have them, installing your fan should not be an extreme sport. They include:
After ensuring you have all these, make sure you also have your complete materials i.e the fan you want to fix.
Unpack your ceiling fan and set aside your ceiling fan from the switches, the wire connectors, the fan brace and the box assembly. Do not forget to compare all the dismantled parts to the instruction in the manual to confirm that all the parts have been included in the fan that was packed. Now, on how to install a flush mount ceiling fan:
This is where the 2-foot level comes in. you use it to measure the vertical distance between the level and the ceiling. Whatever measurement you get should be divided into two to help you get the drop over 12 inches of horizontal run.
Prior to commencing installation, make sure you turn the power off where the main panel is, then remove the light fixture. Use your hammer and the block of wood to remove the existing electrical box from the frame.
Go ahead to free the electrical cable by pulling it out from the old box through the ceiling hole. However, let the old box remain in the ceiling cavity.
At this point, put the fan brace into the hole where the old fixture was connected. Do not make the mistake of inserting it into a plastic electrical box. Then press the flat edge of the feet against the ceiling, and make the shaft stay above the hole. Pull down the base to be sure the mounting will hold the weight of the fan in place while running. Rotate the shaft to tighten the brace to the frame.
Take the existing wire and place it into the cable clamp on top of the new metal box. Now, slide the new box above the saddled screws. Insert the nuts and fasten the box to the shaft. Use a nut driver for this. Wrap the grounding screw with about ¾ loop of wire and tighten the screw.
Put the hanger bracket along with its opening on the raised side of the ceiling. Check for the correctly-fitting screws that come with the fan brace. After this, screw the hanger bracket into the box.
After assembling the fan, raise it over the open side of the bracket and lower it to fit in. Rotate the motor till the ball slot is tightened above the tab on the hanger bracket.
Use a wire connector to attach the bare ground wire from the inside of the box to the ground wire on the hanger bracket. Now, connect the white neutral wire from the motor to that of the box. Connect the blue and black wire from the wire to the black hot wire box. After connecting them, fold them neatly into the box.
Tighten the ceiling fan blades to the brackets and screw the brackets below the motor. Use the screwdriver to screw in the bracket while you lift the assembled blades in position. After that, drive in the screw.
Place the radio receivers inside the switch house then attach the light pod wires. When doing this, make sure to follow the instructions on the manual. Observe the settings on the receiver’s code to enable you dial these same settings on the electronic controls on the wall switch. When you have gotten halfway, loosen the screws in the switch housing hub. Plug in the motor wires in the receptacle on the receiver. Afterward, twist the housing into place and fasten the screws again.
Remove the old wall switch and attach two black wires to the new switch and then onto the wires that were connected to the old switch before. Use a wire connector to do this. Fit in the switch into the box and mount on the cover plate.
In case that was a little too confusing to grasp, look at these practical steps:
Do this by unscrewing the four screws that is on top of the canopy. Among these four screws, there are slotted screws and non-slotted screws. Remove the non-slotted ones first then go on to unscrew the slotted ones. Then you can conveniently remove the hanger bracket.
Aside from the top cover of the canopy, it also has a bottom. Remove the bottom cover of the canopy by turning the bottom cover in a counterclockwise manner.
There is a ceiling outlet box with screws and washers, you must secure the hanger bracket to this.
Those supply wires? Yes, insert them through the hole in the ceiling’s hanger bracket.
Of the six screws in the hanger bracket, remove three and remove the lock washers from the collar of the top motor.
Make sure the mounting holes align with those of the motor and fasten them together with the screws and lock washers.
Finally, carefully tighten the mounting screws.
By the way, if you need help with installing a regular fan, click here to read How To Fix A Ceiling Fan.

To reduce the risk of fire outbreak or electric shock, you are advised to use only an outlet box or supporting system that has been marked acceptable for fans.
Also, to reduce the risk of fire outbreak and electrical shock, the fan should not be used alongside any Solid-State Speed Control Device.
You must be logged in to post a comment.